
How to Change or use Custom ringtone in iPhone: Bored of the same ringtones on your iTunes? Have you started to have a bad association with your morning wake-ups? Do all the default ringtones now make you not get up from bed? If yes, then it’s now time to change it! So that you cringe a little less and enjoy more while you get up.
Though iPhone has been around for a long time and yet it has been difficult to add your custom ringtones Good news is that it is now possible to get rid away from your boring ringtone and have a customized one for your device. Follow the steps mentioned below in the article to change the ringtone and customize it as per your choice.
Contents
Step 1- How To Get a Sound file convert into a Custom ringtone.
- Select a song file to convert into a custom ringtone. This song file can be a recording of your loved one, song, or your favorite line.
- This sound file needs to be converted into a custom ringtone, and access iTunes on your computer.
- Now, navigate to file> Add to the library and find the file on your computer. Anything that is bought in iTunes will already be in the iTunes which might simplify things a bit. You will need this sound file imported into iTunes to work on it.
- After this decide on what part of the song you would like to keep it as your ringtone. We suggest you keep things 30 seconds or less as ringtone and 5-10 seconds as your text tones.
Step 2- How to Change or customize ringtone on your iTunes.
Once you have decided on the sound chunk follow the steps mentioned below to get your desired ringtone.
- Tab on the sound file you have selected and right-click on it to “Get Info” and “Song Info”
- Now, select the “options” tab, and click the “start” and “Stop” square boxes so that they are checked off.
- You will have to now insert the start time for the part of the song or file you have selected as your ringtone and also the end time in the text boxes which is next to the check marks. Make sure you use decimal places here which can help you to be really precise.
- Click on the OK option to change the file types. You will now have to change the file type of the sound file more than once to make it a ringtone. The first step is to change your sound file to AAC but for it, you will have to check your iTunes preferences.
In order to check preferences.
- Go to iTunes 12.4 or later, now click edit, then preferences.
- If you have earlier versions of it then click iTunes, then preferences which you can find in the top left corner of the window.
- Now navigate to the general tab and tab on the “Import Settings” option.
- Also, make sure that the option of “Import using” is to set to “ AAC Encoder”.
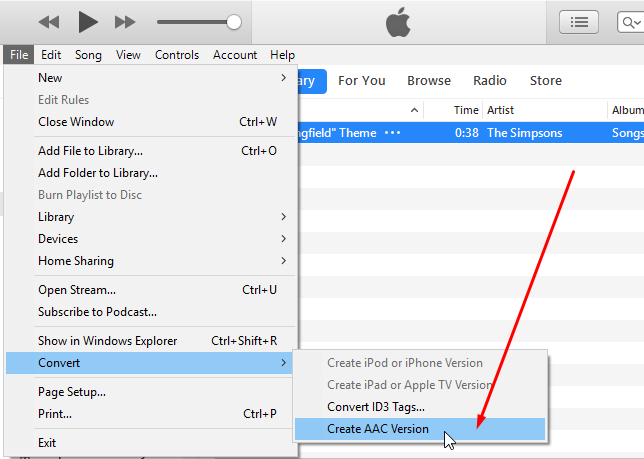
Step 3- Convert the file (create ACC version)
- For iTunes 12.4 or later version. Select the file you are converting and then click file>convert. If you have an earlier version of iTunes select the sound file again and right-click on it.
- Click now on the “Create ACC Version” option due to which a new file will appear and would be of the length you selected. This file now needs to be converted into a new format before we begin the process go to “Get Info” or “Song info” to unselect the stop and the start time in your original file. This will make sure that the next time you listen to the song you can hear the full song and not the length of the song that you selected for the ring tone.
Step 4- Convert the file to .m4r
- Right-click on this file, and select the option “Show in finder” or “Show in windows explorer” which depends on your device if you are using a mac or pc.
- Rename the file by right-clicking it in the explorer or finder.
- Now change the extension to .m4r when you are asked if you want to change the file type, make sure to click yes.
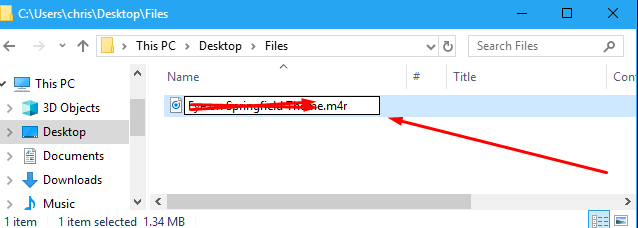
Note – This trips a lot of people make sure that you add the extension properly.
Step 5- Get it on your iPhone now
- Keep the explorer or finder window open from the conversion.
- Now, plug your device i.e iPhone into your computer with a USB cable, and then wait for few seconds to appear in iTunes.
- Make sure you can access “Tones” by clicking the arrow which is next to your iPhone.
- Drag the custom file that you made using the finder or explorer window that you have opened into the tones area.
- Upload the file to your device and once it is done it will be there forever.
Step 6- Set your Custom Ringtone as Ringtone or Text tone.
- Navigate to the settings option on your device, click on the sound option.
- Now tap the ringtone or text tone the one you want custom sound for.
Step 7- Select the custom ringtone from the ringtones listed on your device.
To set the custom ringtone as your Alarm.
- Add a new alarm or select edit which you will find the top left corner of the screen and click on a premade alarm you want to adjust.
- Select the “sound” option on the window that pops up and scroll the ringtones list. Tap on the “back” in the top left corner then save in the top right of the screen.
Conclusion – Set a Custom Ringtone to iPhone & iPad
Hope you have been able to custom your ringtones now with the help of the article. Do let us know if you face any difficulty or have any concerns regarding the same via the comment section. We will try to solve it. Now create as many as ringtones that you would want to so that you aren’t bored of the same repetitive. Stay tuned to our website for more such awesome hacks.
Thank You.