
Do you know that when you delete a file from your Android device it actually stays on your device until new data overrides the same? So, if you are planning to get a new Android device and dispose or sell your old Android mobile device, you must ensure that the data residing on your old device is permanently deleted.
This will prevent any kind of data-retrieval software to extract contents from your old Android mobile device thereby preventing sensitive information to fall in wrong hands. In this post, we are going to share some of the best ways to permanently erase/delete data from an Android device.
Contents
Does Factory Reset Deletes Data Permanently?
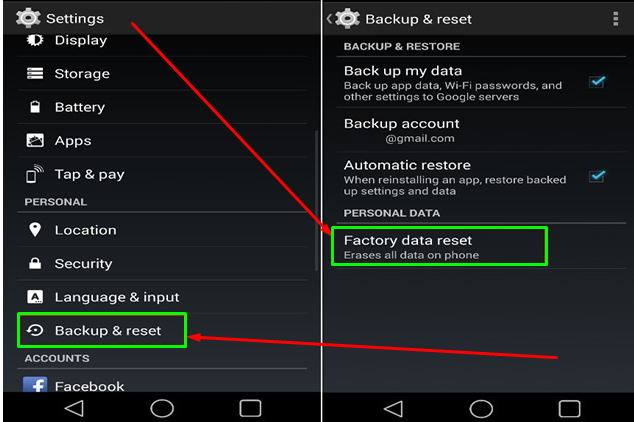
You might be thinking that doing a ‘Factory Reset’ will clear out the things. Though significant data gets deleted with a ‘Factory Reset’ tiny chips of information still remain in the internal memory.
You must check this out: 5 Best FaceTime Alternatives for Android Devices.
How to Permanently Delete Data from an Android Device
Way 1 > Encrypting the Device Storage
Prior to doing a Factory Reset, you can encrypt your device’s storage. For that please make your way to Settings > Security and click on Encrypt Phone option. Once the encryption is complete, you can proceed with the Factory Reset.
Encrypting prior to doing a Factory Reset will encrypt the entire data present on your device. So, even after performing a Factory Reset, tiny chips of data remain, it will simply be gibberish for anybody who tries to extract it. Now, it’s very easy to Add Custom Ringtone to iPhone with this Easiest Way we have out there.
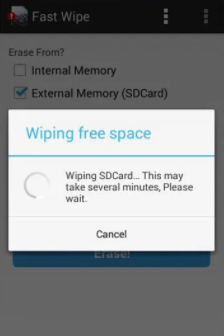
Way 2 > Overwriting the Free Space
As mentioned in the beginning, the items that you delete are usually not permanently erased until they are overwritten by new data. So, if you wish to throw in an extra layer of security after performing a Factory Reset, then you can try filling up your device’s internal storage with junk data.
It’s pretty simple. After encrypting and resetting your Android device, simply set it up without adding any of your personal details. Next, you can fill in the space with junk information. As an example, you can simply record a throwaway video and completely fill in the internal storage of your device. This will make sure that even if there’s any data left in the internal memory after doing a factory reset, the same will get overwritten with the junk data.
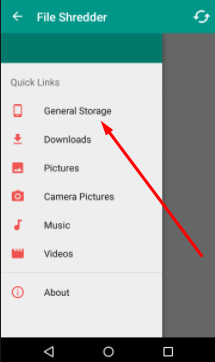
Way 3 > Utilize a File Shredder
File Shredders are the software which will securely erase any data hanging out in the free space on your device that could be recovered. These shredding software utilize state-of-the-art shredding algorithms to overwrite the data with gibberish characters that won’t make any sense. You can choose as to how many times you want the shredder to overwrite the data. More cycles you choose, negligible the chances become of anybody recovering sensitive information from your device. Below we are going to talk about one such File Shredder software that goes by the name of Data Eraser.
- Launch the application and click on Freespace > Internal Storage. The application will tell you how much free space is available for overwriting.
- Hit Continue to select a shredding algorithm. You can select NATO Standard or BSU TL-0342. They will perform a total of 7-8 cycles.
- Hit Confirm to proceed and to initiate the shredding process. Please note that while shredding is underway, your device’s speed will be impacted.
- Wait for the process to get over before using your device for heavy operations.
Please note that using the free version of Data Eraser, you can only utilize the shredder for a limit of 100 MB per day. The paid version, without any limits, will cost you $4.99. Also, check out this awesome way to Run Windows Apps & Games on PC on M1 Macs through CrossOver 20.
Way 4 > Delete Specific Files using Your PC
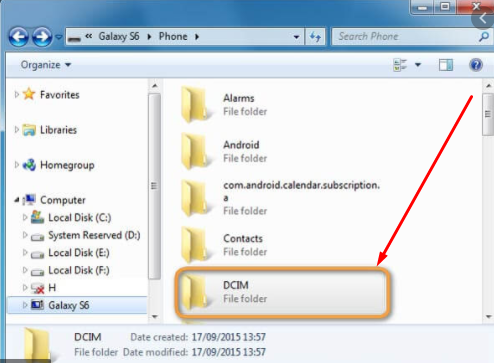
If you wish to permanently delete specific files from your Android device, then you can utilize your PC for the purpose. All you need to do is connect your Android device to your PC and tap on the option Open device to view files from the Auto play pop-up that comes up.
Folders will come up on your PC’s screen. Simply browse and search for the file that you wish to permanently delete. As an example, if you are looking for a photo/video, it will be in DCIM > Camera folder. Upon locating the file, all you require doing is right-clicking on the file and selecting the option Delete from the pop-up menu that comes up.
You will see that the deletion window that comes up, it doesn’t send the files to the recycle bin but permanently deletes the same from your Android device. We have this fantastic Guide on Best Way to Create & Use Memoji in macOS Big Sur, do check it out and we appreciate your feedback.
Final Words – Permanently Erase/Delete Data from an Android Device
These are the four ways that you can employ to make sure that all of the sensitive data from your Android device is permanently deleted before disposing off or selling your old Android device.
If you wish to add to the list of methods provided in this post, please mention the method of your choice in the comments section provided below.
Thank You.